Registration link for the Hyperliquid DEX exchange: 🔗 https://app.hyperliquid.xyz/join/MOONBOT.
If registration is completed without using this link, the Moonbot terminal will automatically insert its referral code on first launch.
Using the referral link or code provides a small fee discount and allows you to activate the PRO version of Moonbot.
Trading on the Hyperliquid DEX exchange uses a standard DeFi wallet with EVM (Ethereum Virtual Machine) support. An EVM wallet is a digital wallet for interacting with the Ethereum blockchain and other EVM-compatible networks.
If you do not yet have an EVM wallet (for example, Rabby, MetaMask, WalletConnect, Coinbase Wallet), you can create one on the 🔗 https://rabby.io/ or use the corresponding browser extensions for Google Chrome.
Additional information on connection methods for the Hyperliquid exchange can be found here: 🔗 Hyperliquid: how to start trading.
Additional information on how to connect to Hyperliquid is available at: 🔗 Hyperliquid: How to start trading.
After installing the wallet browser extension:
-
Сreate a new wallet;
-
Set a password;
-
Write down the unique secret recovery phrase (seed phrase).
⚠️ Attention! Anyone who has access to your wallet password or secret phrase can access your funds. Never share this information with anyone. It is best to write it down on a separate flash drive or paper and store it in a safe place.
Next, perform the following steps:
-
Transfer ETH to the created wallet in the Arbitrum network;
-
Within the wallet, swap ETH to USDC in the Arbitrum network;
-
Leave a small amount of ETH (approximately equivalent to 10 USD) to pay fees (gas) when depositing USDC to the Hyperliquid exchange;
-
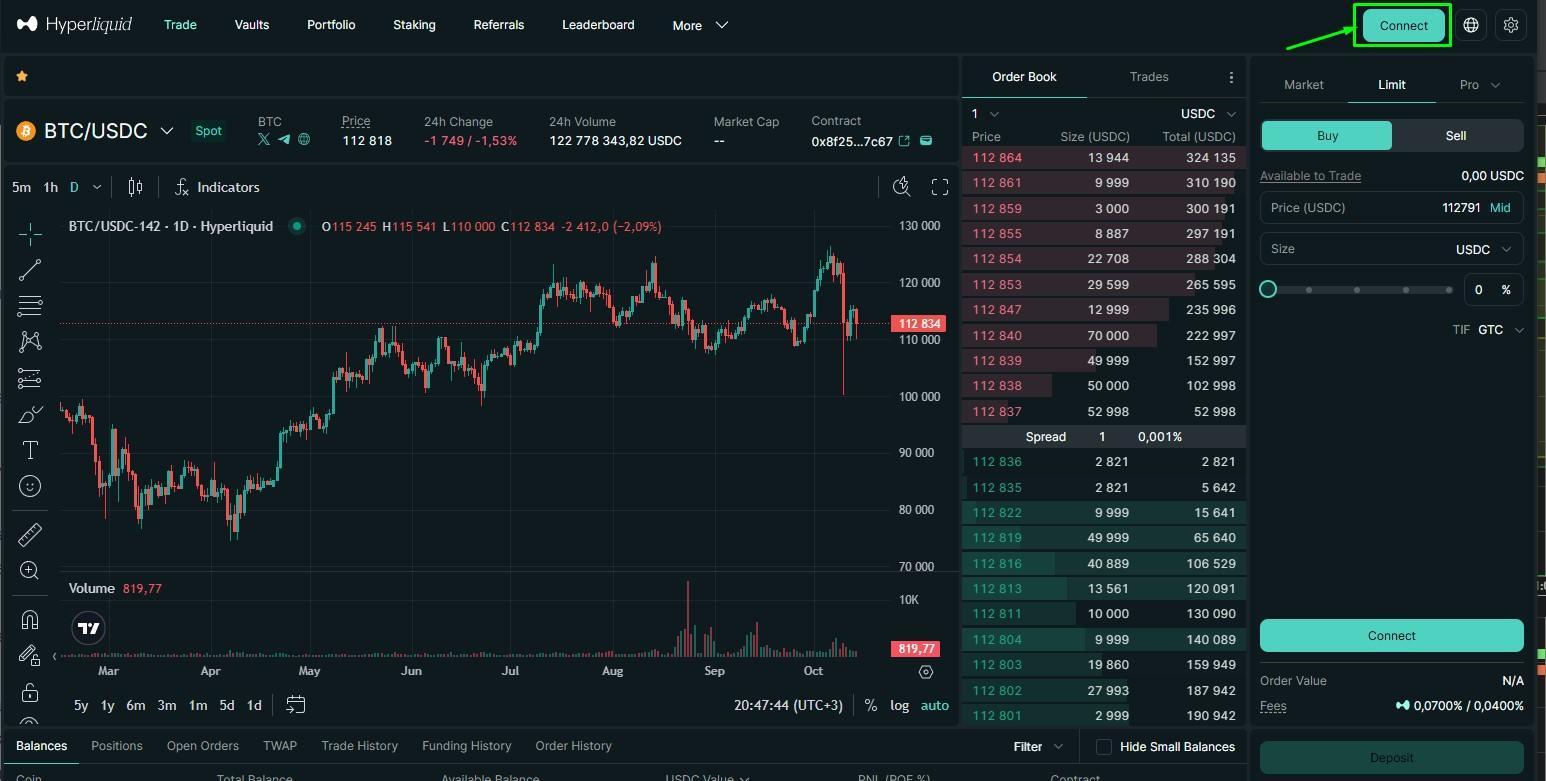
Open the trading page 🔗 https://app.hyperliquid.xyz/trade;
-
Click the Connect button to connect the browser wallet.
Further examples will be provided using MetaMask; similar steps apply to any other wallet convenient for you.
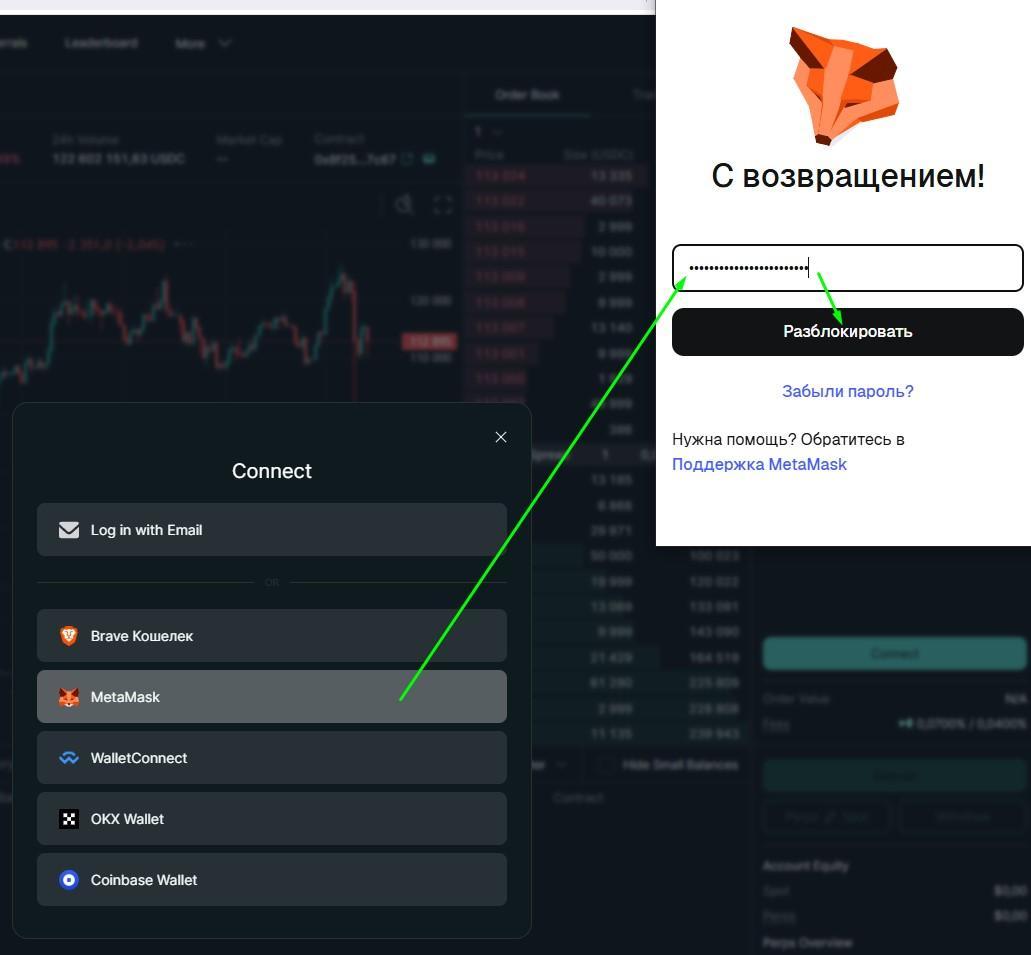
1) In the Connect window, select MetaMask;
2) In the opened browser wallet window, enter the password if required and click Unlock;
3) If your wallet is not listed in the Connect window, select WalletConnect and complete authorization using a QR code.
4) Create a new account in the wallet (if necessary);
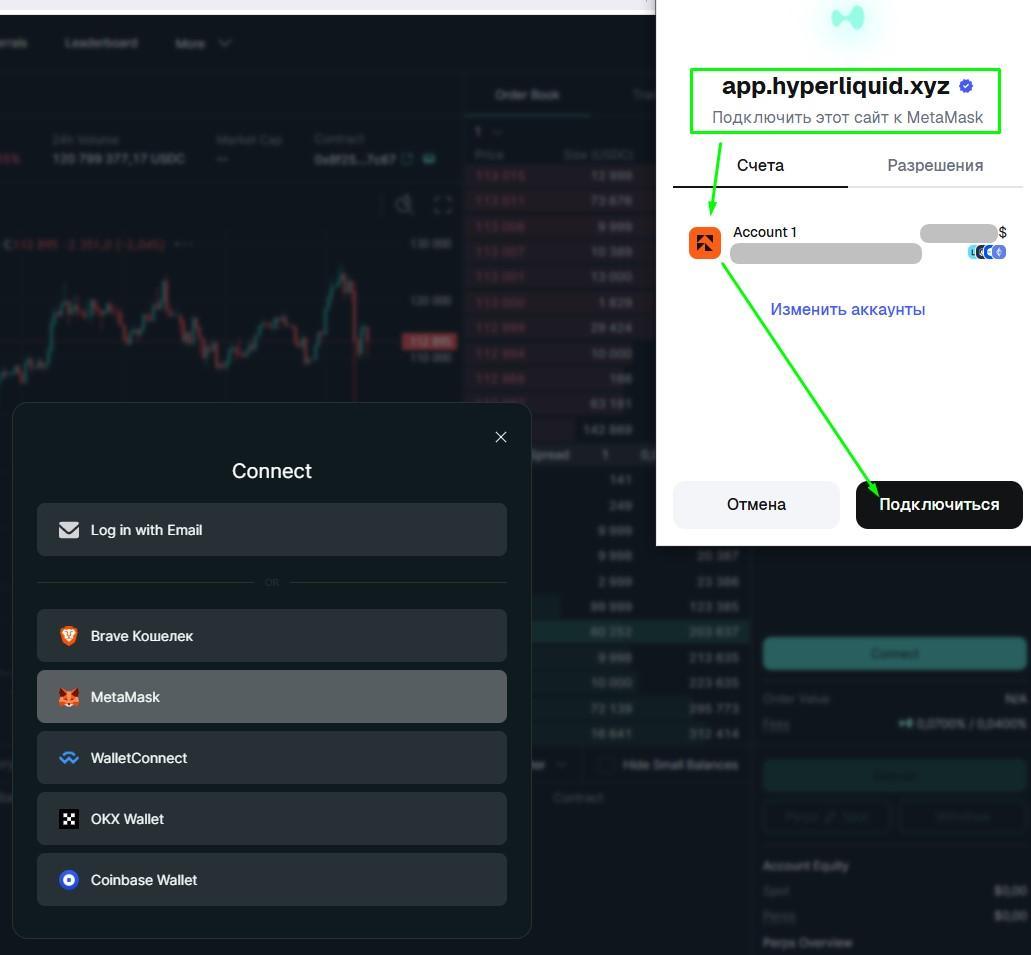
5) Select the account that will be connected to the Hyperliquid exchange and click Connect.
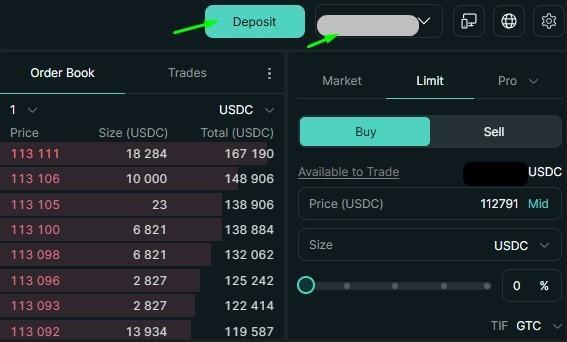
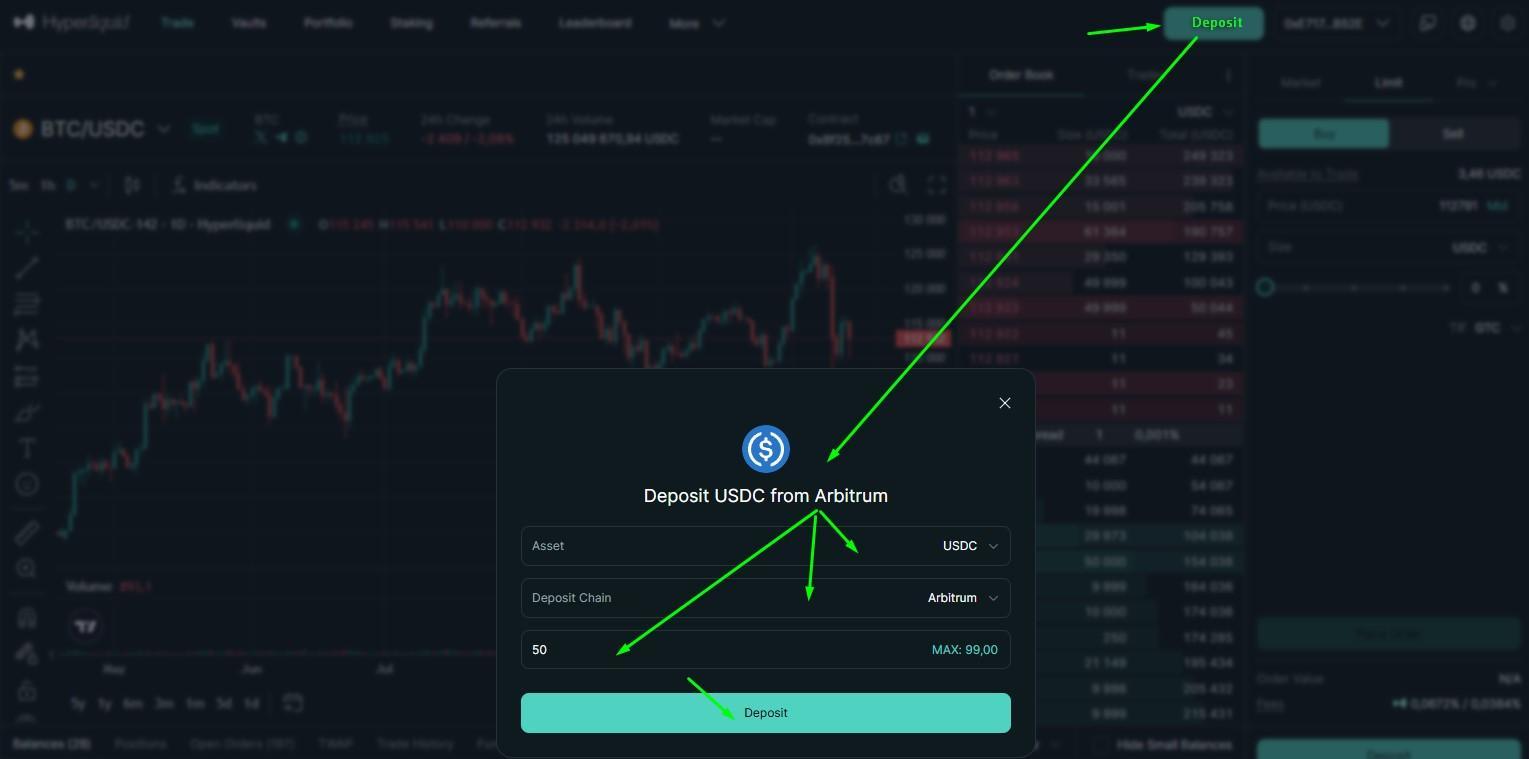
After a successful connection, the Deposit button will appear on the Hyperliquid website, and your trading address on the exchange will be displayed on the right.
6) Click the Deposit button and in the Deposit USDC from Arbitrum window do the following:
-
In the Assets menu, select USDC;
-
In the Deposit Chain menu, select Arbitrum;
-
In the lower field, specify the amount in USDC that you plan to send from the wallet to the Hyperliquid exchange; the minimum deposit amount is 5 USDC; when you click the MAX button, the maximum available amount of USDC in the wallet will be filled automatically;
-
Click the Deposit button.
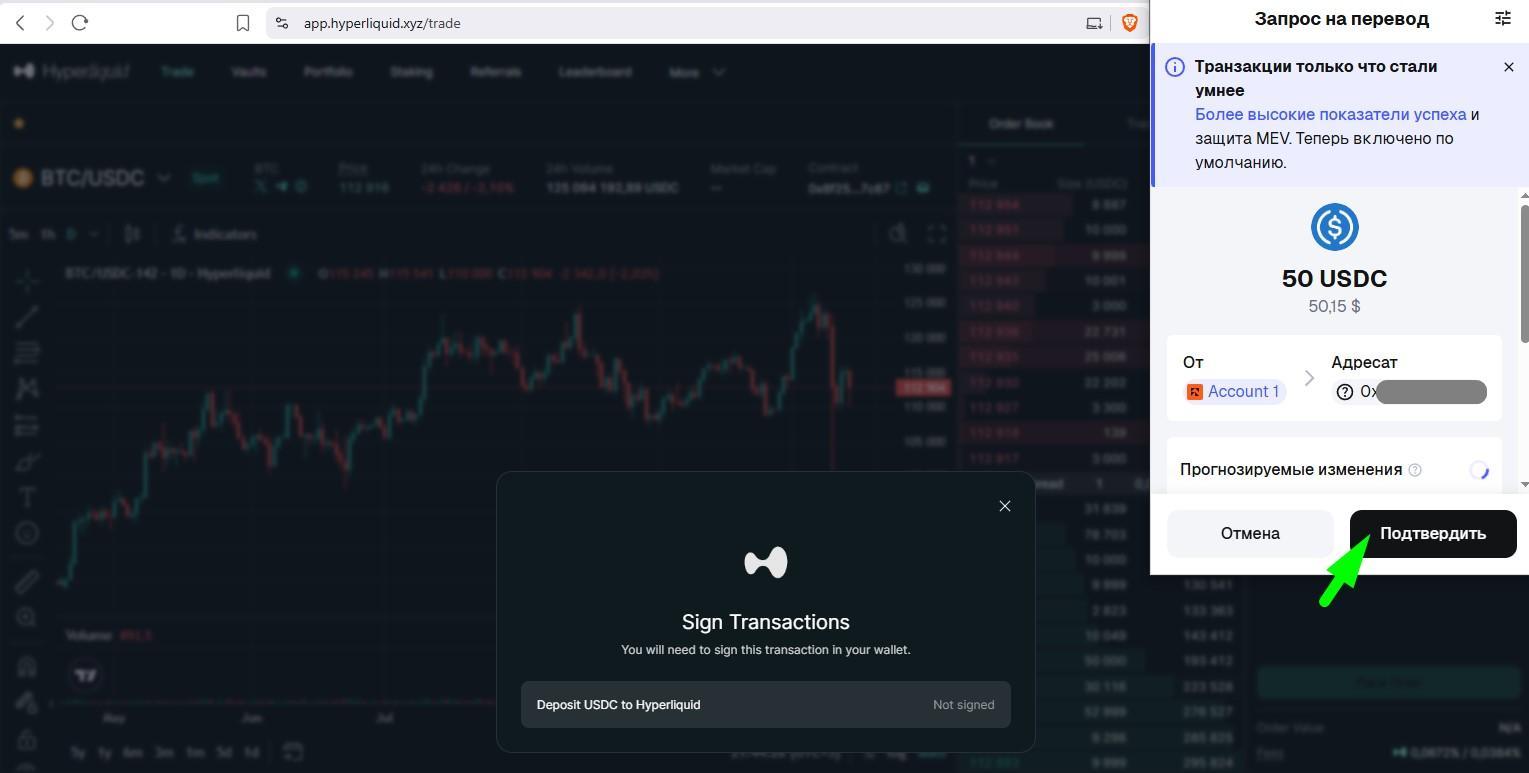
After clicking the Deposit button, the wallet window will open; to confirm the transaction, click Confirm.
💡 Note that your wallet balance must contain a sufficient amount of ETH to pay the transaction fee (gas).
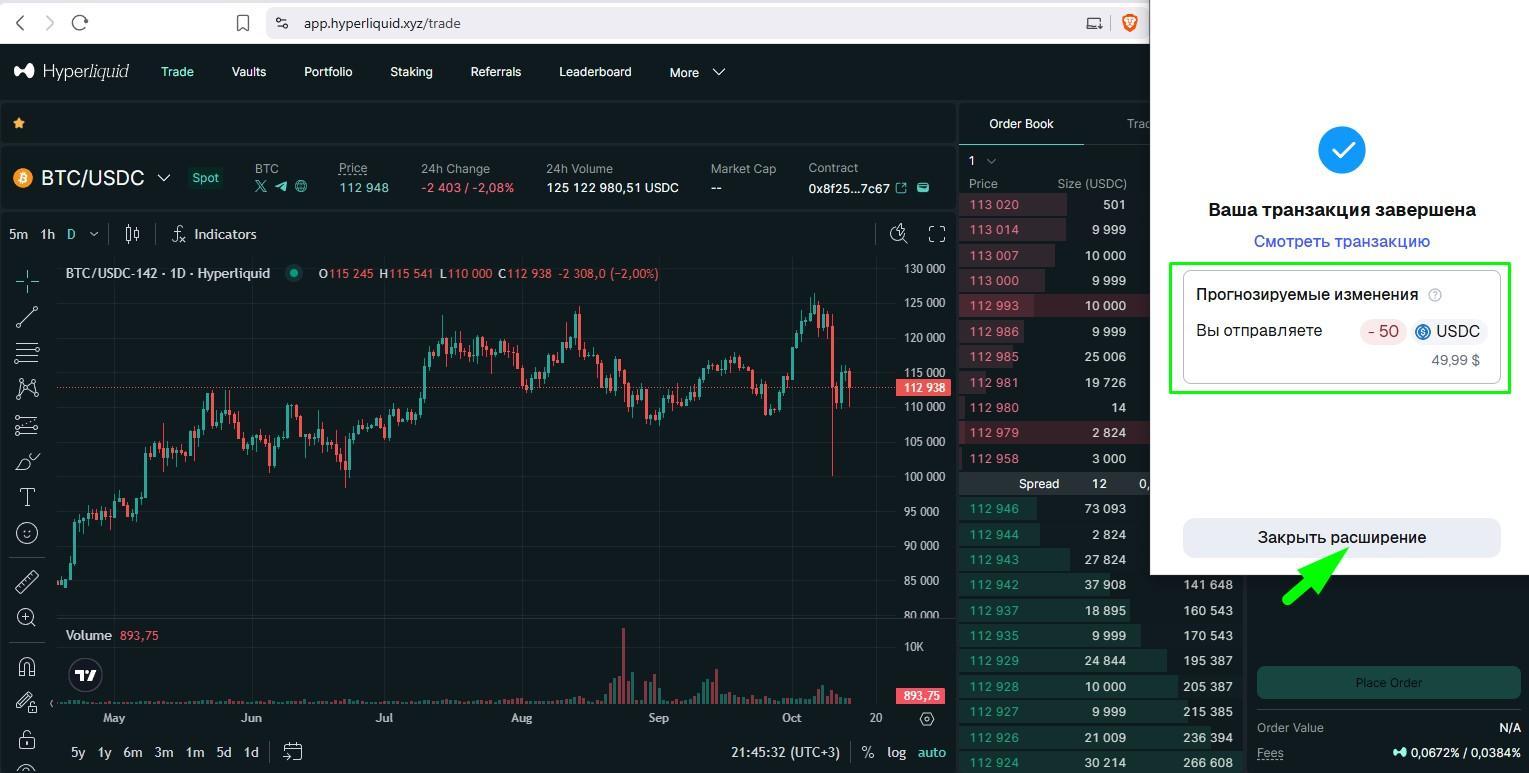
After completing the transaction in the wallet, click Close Extension.
After confirming the transaction on the Hyperliquid exchange, the specified amount of USDC will appear on the futures balance (Perps).
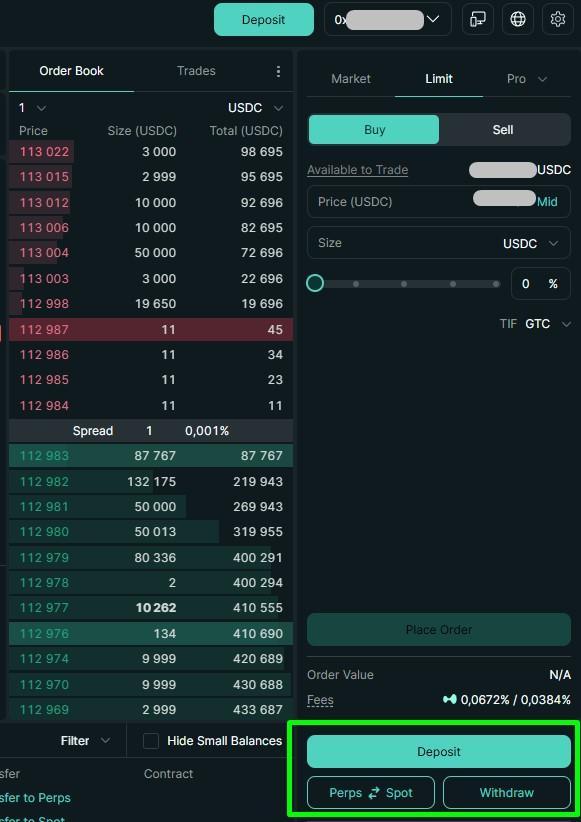
To transfer funds from the futures balance to the spot balance, perform the following steps:
-
Click the Perps-Spot button;
-
Confirm the operation via the connected wallet.
In the same section you can also:
Creating API Keys for the Hyperliquid Exchange
After funding your balance on the Hyperliquid website, perform the following steps:
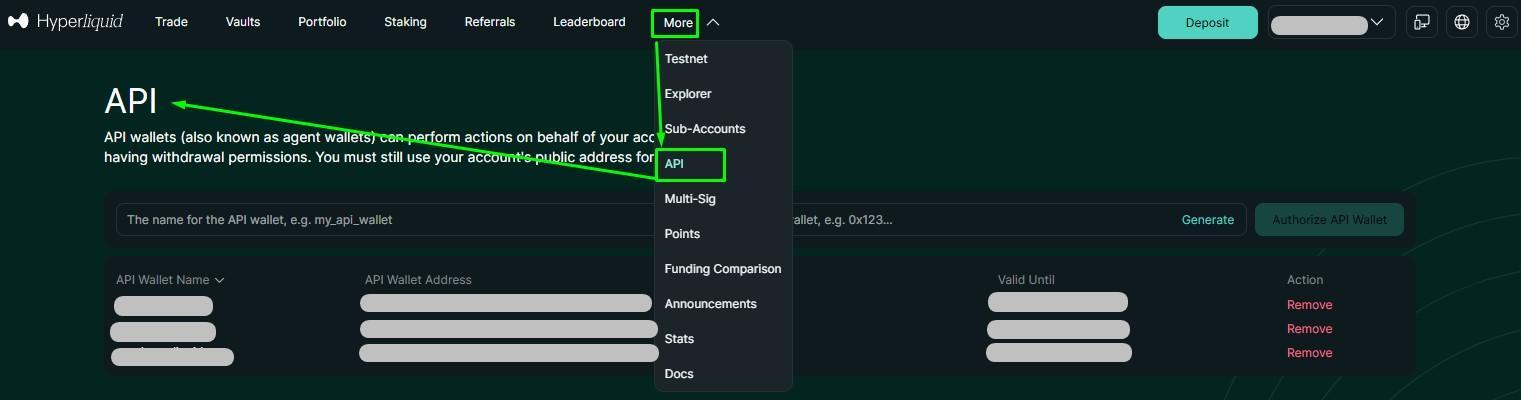
1) Go to the More tab and select API to open the API key creation page;
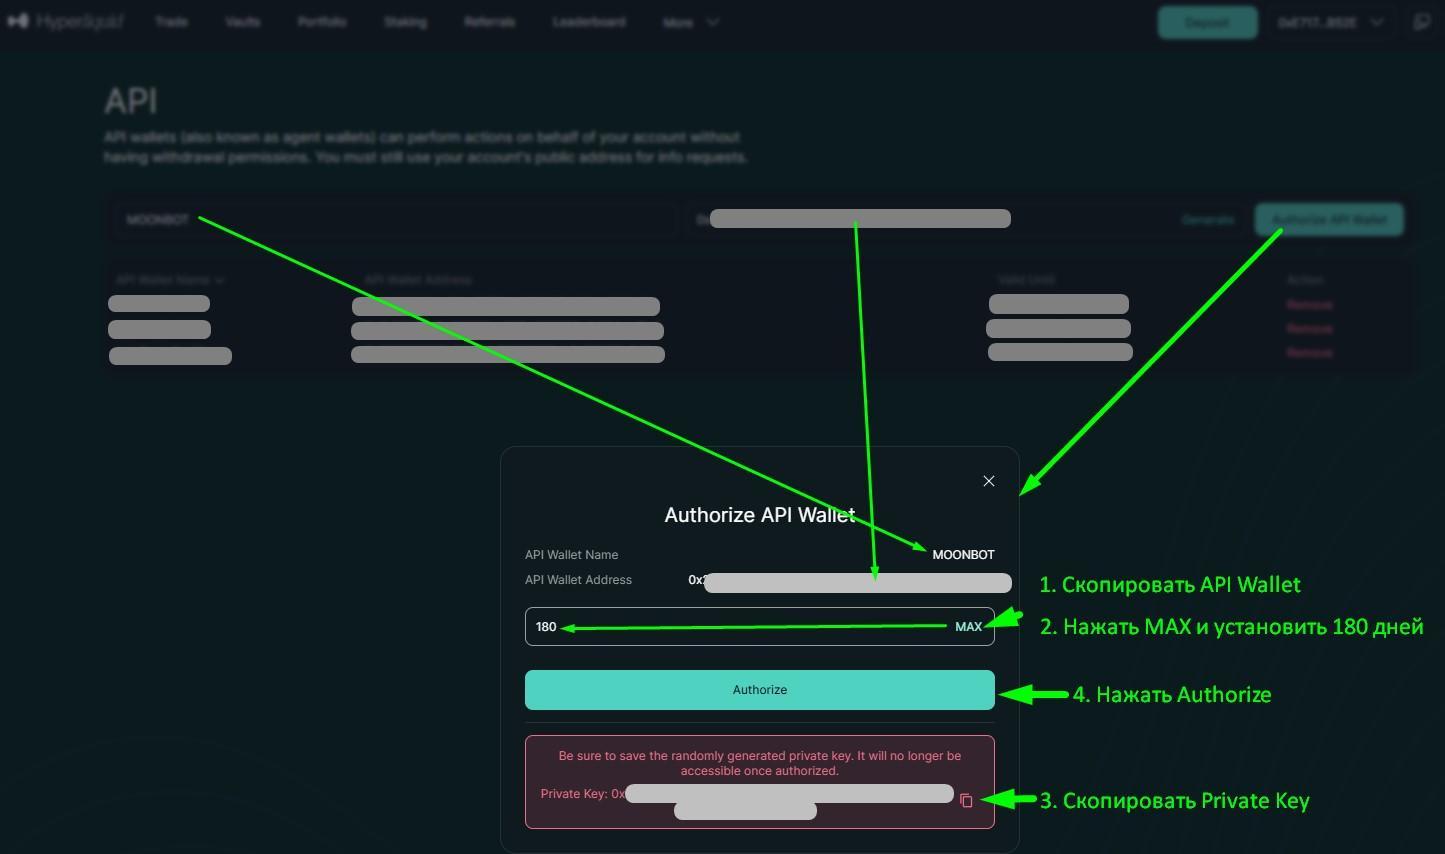
2) In field 1, enter a custom name for the API key (no more than 16 characters) and click Generate;
3) In field 3, the API Wallet Address will be generated; click Authorize API Wallet;
In the opened Authorize API Wallet window:
4) Check the API Wallet Name value (the name specified earlier);
5) Copy or save the API Wallet Address — it will be required for entering in the Moonbot terminal;
6) If necessary, specify the API key expiration period; when you click MAX, the maximum period — 180 days — will be set;
7) In the red field, copy or save the Private Key — it will be required for entering in the Moonbot terminal;
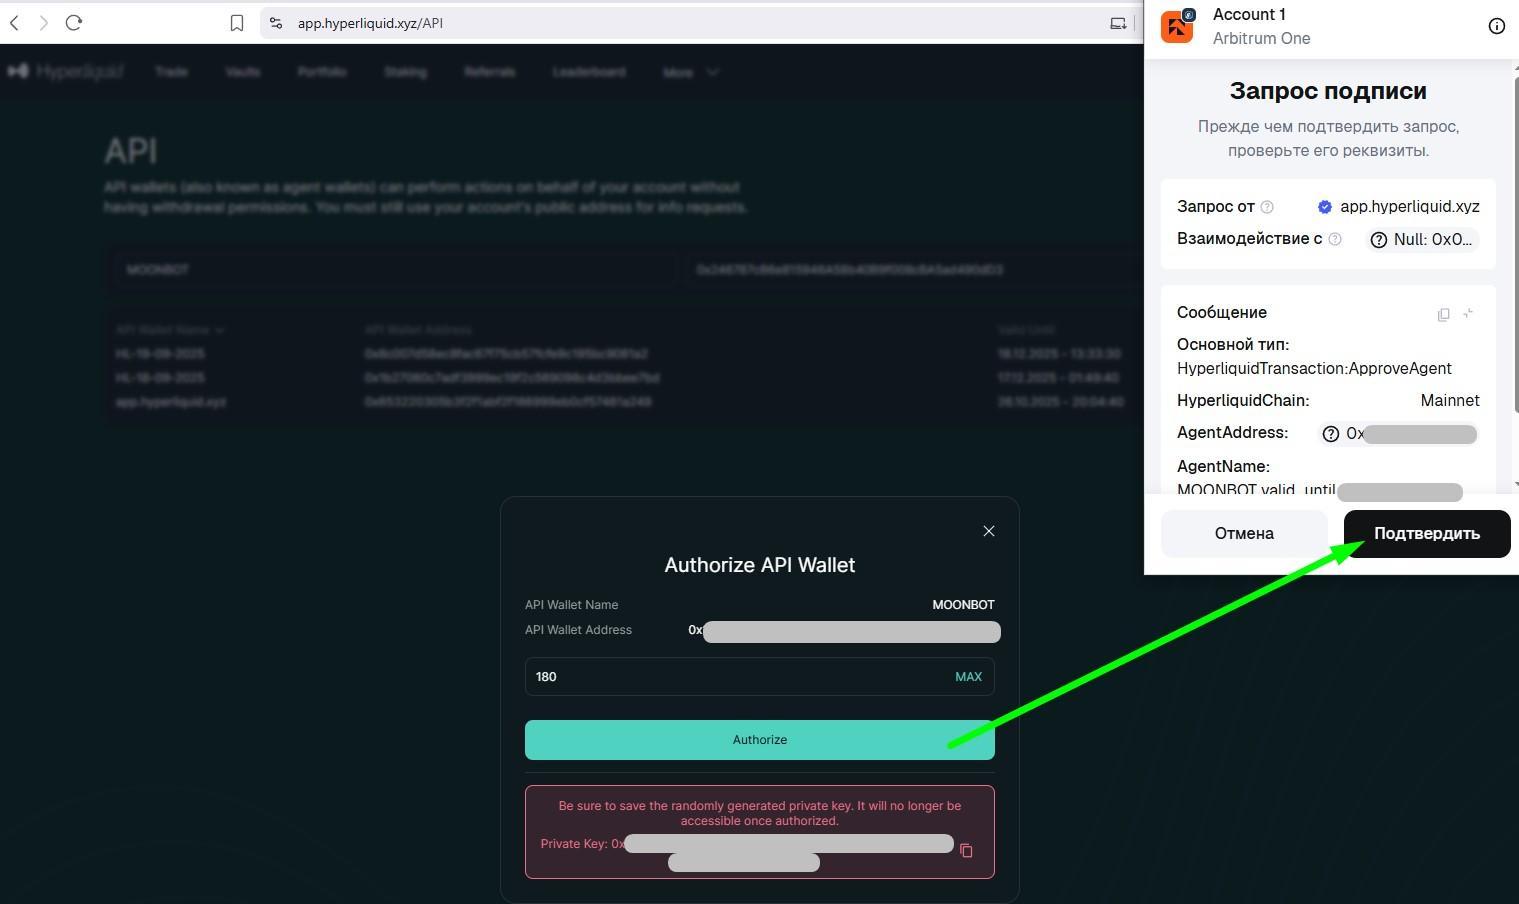
8) Click Authorize;
After that, the wallet will open, where you need to confirm the signature request to create API keys for the Hyperliquid exchange by clicking Confirm.
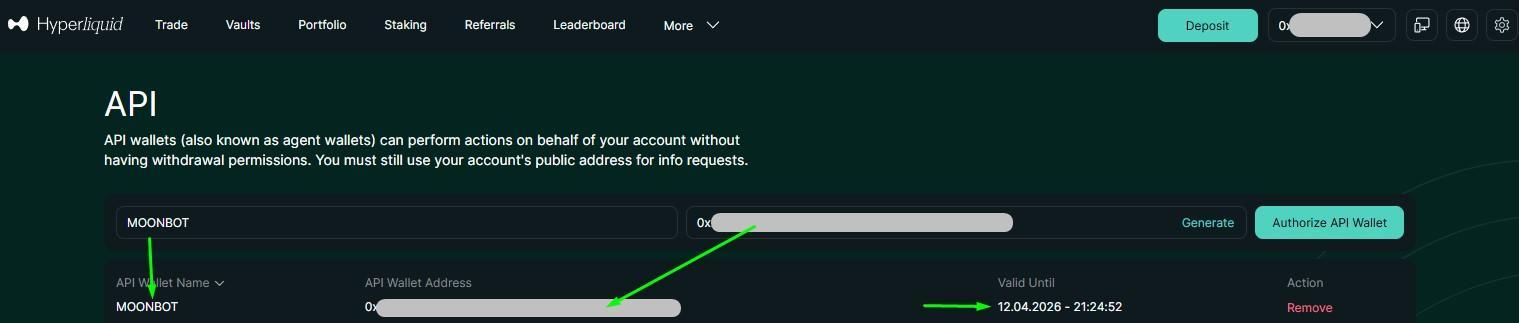
After successful confirmation, an entry with the created API key and its expiration date will appear on the API page. Below, an additional technical API with the name app.hyperliquid.xyz will be created automatically; this key is not used in the terminal, but it is not necessary to delete it.
To delete an unnecessary API key, click the red Remove link.
Activation of API Keys in the Moonbot Terminal for the Hyperliquid Exchange
-
Create API keys on the Hyperliquid exchange website for the main account or a subaccount;
-
Copy the folder with your main PRO terminal for another exchange into a new folder and launch the terminal;
-
Go to Settings → Login, in the Exchange field select Hyper (spot) or Hyper Futures (futures) and click Apply;
-
In Settings → Login, perform the following actions:
-
In the API Key field, enter the API Wallet Address obtained earlier on the Hyperliquid exchange;
-
In the API Secret field, enter the Private Key obtained earlier on the Hyperliquid exchange;
-
Register the entered API keys for the main account or subaccount;
-
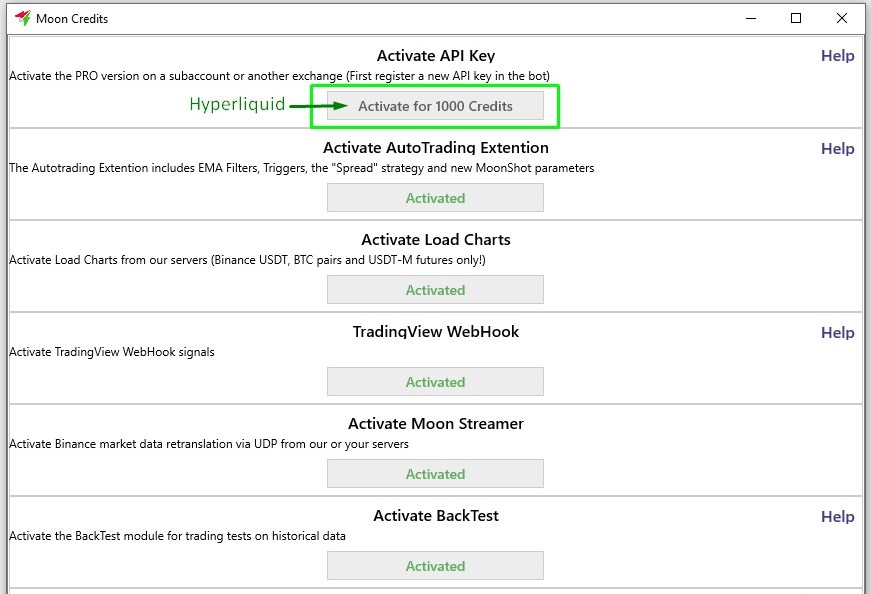
In the lower-right corner of the main window of the Moonbot terminal, click the PRO version label to open the Moon Credits window with activations of paid modules (see the figure below);
-
In the Moon Credits window, the lower section displays the balance of your Moon Credits; activating the main account or one subaccount of the Hyperliquid exchange requires 1000 Moon Credits; if the balance is sufficient, in the Activate API Key block click the Activate for 1000 Credits button; after that, the API keys will be activated in this terminal;
-
If you need to activate additional subaccounts of the same exchange, repeat the procedure the required number of times;
-
If after connection there are no trades in the terminal or the order book is not displayed, click Menu → Refresh Connection or restart the Moonbot terminal several times until the data appears.
Technical Details When Working with the Hyperliquid Exchange
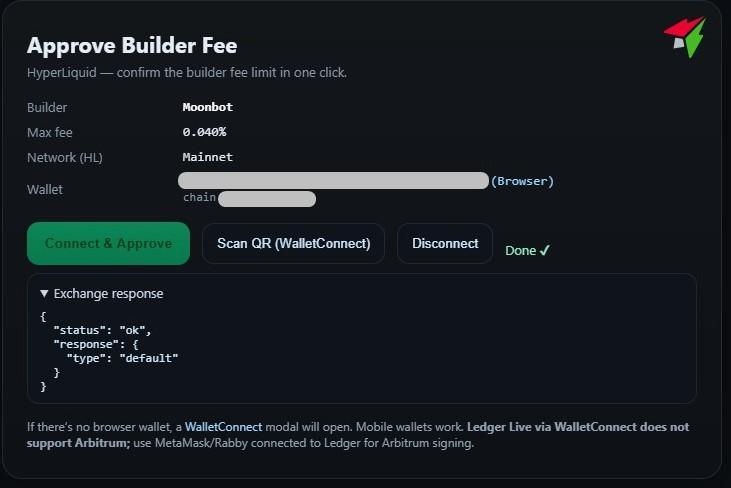
1. Fees on the Hyperliquid exchange may be charged either in USDC or in traded coins; current rates and ways to reduce them are described on the page 🔗 https://hyperliquid.gitbook.io/hyperliquid-docs/trading/fees; additionally, a small developer fee of the Moonbot terminal is charged, which is activated on the first launch of the terminal connected to Hyperliquid; on the first launch, an API key error may appear and the page 🔗 https://api.moon-bot.com/files/HLsign.html with the Approve Builder Fee window will open automatically; click Connect & Approve, then confirm the operation in the browser wallet; after the Done status appears, restart the Moonbot terminal as administrator; this procedure must be performed once for each account;
2. Strictly follow the rule “One API key = One terminal = One launch”; violation will lead to malfunctions of terminals running on the same API; the exchange uses the principle of monotonic command indexing, therefore two terminals with the same API break the request chain; a separate API key is required for each simultaneously running terminal;
3. Exchange limits are 1200 requests per minute for all operations; additionally, Fill Ratio applies — 1 request per each 1 USDC of total trading volume; the initial buffer is 10,000 orders; when it is exhausted, you need to execute a trade to refresh the limit; details are available on the page 🔗 Rate limits and user limits;
4. On the Hyperliquid DEX exchange, deposits and withdrawals are performed only in USDC; withdrawal of other tokens is possible via third-party services;
5. Latency (ping) on Hyperliquid may be 1–2 seconds; this is due to the specifics of DEX and transaction processing on the blockchain;
6. “Lost” positions and coin balances after closing trades are possible; regularly check balances in Menu → Assets; partial order execution may lead to remaining balances being stuck;
7. Loading of coin data at startup is accelerated when using the Chart Loading module and with the Settings → Main → Analyze сoins on startup option enabled;
8. Cross and Isolated margin modes are supported;
9. Automated trading may be difficult due to 1–2 second delays and API limitations; order losses and absence of some indicators are possible;
10. The terminal folder contains the secp256k1.dll file used for signing blockchain requests; do not delete it when copying the folder;
11. In the FREE version of Moonbot, orders are not placed;
12. Chart loading is supported only on futures;
13. In the Menu → Assets window, spot and futures balances are displayed; transferring funds between them is performed only on the Hyperliquid website with wallet confirmation;
14. The exchange does not provide PNL data via API; the PNL value on the chart is displayed as 0$; actual results can be checked on the page 🔗 https://app.hyperliquid.xyz/portfolio;
15. On futures, a liquidation line is displayed when opening a position; after closing the position, the line disappears;
16. The API load indicator is calculated; the exchange does not provide exact API usage data; mark price updates occur every 6 seconds;
17. With the Settings → Advanced → Engine Settings → Ignore Replacing bug option enabled, faster order replacement is possible;
⚠️ Warning! With partial order execution on a DEX, the probability of the “replacing bug” is very high; order replacement may lead to stuck balances;
18. The LogEveryRequest command in the coin input field outputs all requests to the log; used for diagnosing blocks;
19. When receiving error 429 while placing a take order, 5 additional attempts are made with increasing delays;
20. On futures, orders are automatically placed in ReduceOnly mode, which prevents position reversal when closing a long;
21. Balance updates are accelerated and the order book depth is increased compared to earlier versions;
22. On the exchange, it is possible to create up to 50 subaccounts with a trading volume above 100,000 USD; they work only via the web interface and are not supported in the Moonbot terminal; for API usage, a new wallet must be created and activated again in the terminal;
23. When connecting the Moonbot terminal to the Hyperliquid exchange, trading via API on HIP-3 markets is available.
These markets are treated as separate entities and require a specific connection in Moonbot, at a rate of one market per Moonbot instance.
To connect to one of the required markets, click the "HL:..." button at the top of the Moonbot terminal’s main window and select the relevant one.
If you need to trade on different markets simultaneously, you should create several copies of the Moonbot terminal, specify your own API credentials in each one, and select the relevant market.
⚠️ Warning!
-
When creating folder copies and running multiple Moonbot terminals simultaneously, make sure that each of them uses its own API and they do not overlap. That is, you must create and activate separate API keys in Moonbot for each HIP-3 market, since the Hyperliquid exchange uses the principle of monotonic command indexing, and two or more running Moonbot terminals with the same API keys will break the command chain, which will lead to errors.
-
In Moon Kernel mode – Moonbot’s client-server connection, where the Moonbot Client is installed on the local computer and the Moonbot Kernel is hosted on a VPS server – when trading on HIP-3 markets, ensure that the same market is specified everywhere.
-
On the Hyperliquid exchange website, in your account settings for trading on HIP-3, you need to:
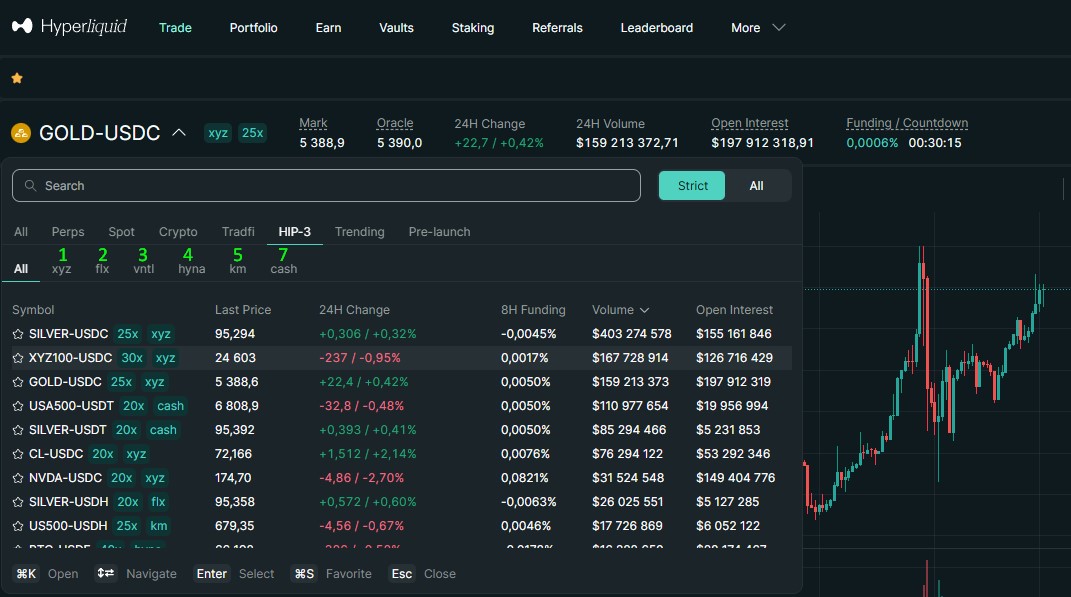
To find out which HIP-3 markets are currently available and their indices, you need to launch the Moonbot terminal, for example with HIP3_DexIndex=1 for xyz (XYZ) in the MoonBot.ini, and check the log for the list of current indices.
At the moment, the following markets will be displayed in the log:
DEX[1]: xyz (XYZ)
DEX[2]: flx (Felix Exchange) (*currently not serviced)
DEX[3]: vntl (Ventuals) (*currently not serviced)
DEX[4]: hyna (HyENA)
DEX[5]: km (Markets by Kinetiq) (*currently not serviced)
DEX[6]: abcd (ABCDEx) (*currently not serviced)
DEX[7]: cash (dreamcash) (*currently not serviced)
DEX[8]: para (Paragon)
DEX[9]: mkts (Markets By Kinetiq)
In the Moonbot terminal for the Hyper-Futures exchange, the following markets can be selected from the pair selection menu:
-
crypto
To select the Hyper-Futures market (excluding HIP-3) with a USDC balance for trading.
0G, 2Z, AAVE, ACE, ADA, AERO, AIXBT, ALGO, ALT, ANIME, APE, APEX, APT, AR, ARB, ASTER, ATOM, AVAX, AVNT, AXS, AZTEC, BABY, BANANA, BCH, BERA, BIGTIME, BIO, BLUR, BNB, BOME, BRETT, BSV, BTC, CAKE, CASHCAT, CC, CELO, CFX, CHIP, COMP, CRV, DASH, DOGE, DOT, DYDX, DYM, EIGEN, ENA, ENS, ETC, ETH, ETHFI, FARTCOIN, FET, FIL, FOGO, GALA, GAS, GMT, GMX, GOAT, GRAM, GRASS, GRIFFAIN, HBAR, HEMI, HMSTR, HYPE, HYPER, ICP, IMX, INIT, INJ, IO, IOTA, JTO, JUP, KAITO, KAS, kBONK, kFLOKI, kLUNC, kNEIRO, kPEPE, kSHIB, LAYER, LDO, LINEA, LINK, LIT, LTC, MANTA, ME, MEGA, MELANIA, MEME, MERL, MET, MINA, MNT, MON, MOODENG, MORPHO, MOVE, NEAR, NEO, NIL, NOT, NXPC, ONDO, OP, ORDI, PAXG, PENDLE, PENGU, PEOPLE, PNUT, POL, POLYX, POPCAT, PROVE, PUMP, PURR, PYTH, RENDER, RESOLV, REZ, RSR, RUNE, S, SAGA, SAND, SEI, SKR, SKY, SNX, SOL, SOPH, SPX, STABLE, STBL, STRK, STX, SUI, SUPER, SUSHI, SYRUP, TAO, TIA, TNSR, TRB, TRUMP, TRX, TURBO, UMA, UNI, USUAL, VINE, VIRTUAL, VVV, W, WCT, WIF, WLD, WLFI, XAI, XLM, XMR, XPL, XRP, YGG, ZEC, ZEN, ZETA, ZK, ZORA, ZRO
-
xyz
To select the HIP-3 xyz (XYZ) market with a USDC balance for trading.
AAPL, AMAT, AMD, AMZN, ARM, ASML, AVGO, BABA, BB, BE, BIRD, BOT, BRENTOIL, BX, CBRS, CL, COIN, COPPER, COST, CRCL, CRWV, CXMT, DELL, DKNG, DRAM, EBAY, EUR, EWJ, EWT, EWY, EWZ, GBP, GIGADEV, GME, GOLD, GOOGL, HIMS, HOOD, HYUNDAI, IBM, INTC, JP225, JPY, KIOXIA, KR200, LITE, LLY, META, MINIMAX, MRVL, MSFT, MSTR, MU, NATGAS, NBIS, NFLX, NOK, NOW, NVDA, ORCL, PALLADIUM, PLATINUM, PLTR, PURRDAT, QCOM, QNT, RIVN, RKLB, SHAZ, SILVER, SKHX, SKHY, SMH, SMSN, SNDK, SOFTBANK, SP500, SPCX, STRC, TSLA, TSM, URNM, USAR, WDC, XLE, XYZ100, ZHIPU, ZM
-
flx
To select the HIP-3 flx (Felix Exchange) market
* This market is not currently supported on the exchange; if you try to list it in the Moonbot terminal, the "crypto" market will be selected instead.
-
vntl
To select the HIP-3 vntl (Ventuals) market
* This market is not currently supported on the exchange; if you try to list it in the Moonbot terminal, the "crypto" market will be selected instead.
-
hyna
To select the HIP-3 hyna (HyENA) market with a USDC balance for trading.
1000PEPE, ADA, BASED, BNB, BTC, DOGE, ENA, ETH, FARTCOIN, HYPE, LINK, LTC, PUMP, SOL, SUI, XPL, XRP, ZEC
-
km
To select the HIP-3 km (Markets by Kinetiq) market
* This market is not currently supported on the exchange; if you try to list it in the Moonbot terminal, the "crypto" market will be selected instead.
-
abcd
To select the HIP-3 abcd (ABCDEx) market
* This market is not currently supported on the exchange; if you try to list it in the Moonbot terminal, the "crypto" market will be selected instead.
-
cash
To select the HIP-3 cash (dreamcash) market
* This market is not currently supported on the exchange; if you try to list it in the Moonbot terminal, the "crypto" market will be selected instead.
-
para
To select the HIP-3 para (Paragon) market with a USDC balance for trading.
BTCD, IREN, TOTAL2, CRDO, COHR, STX, OTHERS, AVGO, LRCX, GLW
-
mkts
To select the HIP-3 mkts (Markets By Kinetiq) market with a USDC balance for trading.
US500, USTECH (QQQ)
24. In the Moonbot terminal connected to the Hyperliquid exchange, you can activate the heatmap of trading addresses using the HMap button in the main window, which helps track trading addresses of other traders with indication of the coin name, date, and order size.
More details can be found on the 🔗 HMap Button page.
25. In the Moonbot terminal connected to the Hyperliquid exchange, you can create a special Watcher strategy, which after launch can automatically track the specified trading addresses and mark their activity on the chart with arrows.
More details can be found on the 🔗 Watcher strategy and its parameters page.
26. For the Hyperliquid exchange, a separate setting is available under the Settings –> Advanced –> Engine Settings tab: "Fast IOC (paid)". If this box is ticked, orders that cross the order book are sent with paid priority as IOC (Immediate Or Cancel) – the exchange executes them before standard orders.
The point is that this type of order attempts to be executed immediately. The system takes all available liquidity at your price the moment the order is placed. However, if part of the order cannot be executed (for example, if there simply aren’t enough counterparties at the desired price in the order book), the exchange automatically cancels this "unfilled" portion. In other words, an IOC order does not leave an unfilled portion in the order book – it either fills as much as possible straight away or cancels the remainder.
IOC commission: 0.08% of the EXECUTED volume in HYPE.
IOC priority: ~360 ms.
An IOC order is not placed in the order book: any unfilled balance is cancelled.
Payment for IOC orders: in your Hyperliquid exchange account, go to "Portfolio -> Staking", then transfer HYPE from Spot and do not delegate it to a validator.
27. General Hyperliquid statistics are available on the 🔗 https://stats.hyperliquid.xyz/ page.
28. The official Hyperliquid exchange documentation is available on the 🔗 https://hyperliquid.gitbook.io/hyperliquid-docs page.